Getting started
Outline
We want to write, compile and run our first C program. There are a few steps to accomplish this. First we will make a very simple program whose only purpose is to print the text “Hello world!”. Making such a program is a long-standing tradition in teaching programming languages dating back to the first textbook for C in 1978. There are good reasons for doing this. There is quite a lot that a programmer will need to understand just to make the simplest of programs. It’s important to learn this on a program that is trivially easy before we try to move on to actually doing anything clever in our programs.
There are three steps to making a C program:
- Write the C code
- Compile the code
- Run the program
Initially you will make mistakes in all three of these steps so we will focus on the second and third parts for now and keep the C code simple.
Hello world in Python
First things first: how would we make a hello world program in Python? Well in Python we print things using the print function. So our program just looks like:
All we need to do is write that code in a text editor and then save it as hello.py and then we’re in business! Now I’m assuming that you already know of some way to run the hello.py program that we’ve just created. However I specifically want you to run it from the terminal so that’s what we’re going to look at next. Firstly though create the hello.py program with the code shown above and save it as hello.py and remember what folder you’ve saved it in. It’s very important to remember what folder it is in, and what folder that folder is in and so on. You need to know the full path to the file from the drive letter e.g.:
C:\Users\Dave\Unistuff\EMAT10006\Week1\hello.pyThe terminal
It’s now time to introduce the terminal. Windows comes with a terminal but it’s inconsistent with the terminals on most other computers. We want to use a terminal that behaves the same as terminals on OSX/Linux etc. so we will be using the MinGW Shell. For those interested this is an example of a bash shell however the details are not important. What matters is how to start the shell on the Windows machines in the computer lab. First click on the start menu and type “min” as shown here:
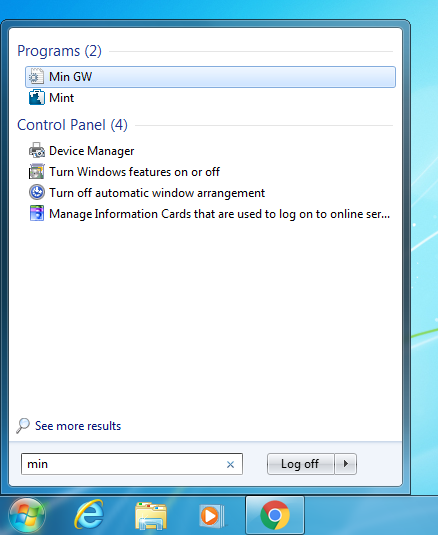
Now click on the “Min GW” item at the top (or just push enter). This should open the MinGW terminal which then looks something like this:
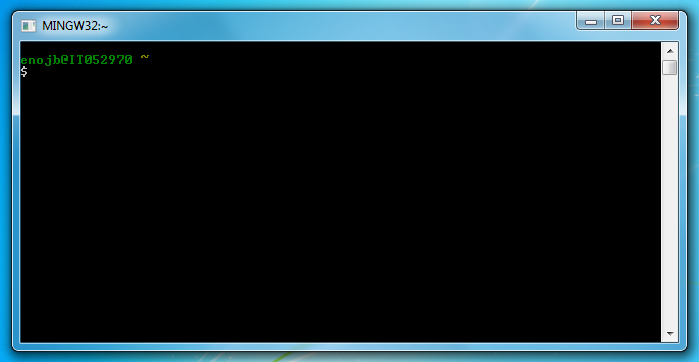
The MinGW Shell is an example of a terminal. This is an interface where you type commands and then hit enter to run the command. Then the command will usually (but not always) print some output that you will see below the command that you typed. You can then type another command.
One thing to note is the text enojb@IT052970 ~. This means that I am logged in as user enojb on the computer whose name is IT052970 and I am currently in the directory called ~. The directory ~ is shorthand meaning my user directory. Your user directory is the particular folder for your user account. On this particular machine it will probably be C:\Users\enojb. However the way that the Windows machines in the University are set up is a little strange. You always have two user directories: one on the C:\ drive at e.g. C:\Users\enojb (if enojb was your username) and one on the O:\ drive at O:\. The user directory on the C:\ drive is saved on the specific computer you are logged into. The O:\ drive is a networked drive: the files you save there will be accessible on all of the University’s computers. I recommend to always save your work onto the O:\ drive so that it doesn’t get lost.
Finally notice the $ symbol in the terminal. This is called the prompt. Any command that you type will appear after the prompt. I don’t want to use lots and lots of screenshots to demonstrate terminal commands so I’m going to format such terminal sessions like this:
$ ls
bin      Desktop    Pictures  src     tmp
current  Documents  Music     Public  Videos
To interpret the console session shown above the line beginning with a $ shows the command that I typed in the terminal ls. The ls command is a special terminal command that means list the contents of the current directory. In this case the directory is my user directory and it shows all of the folders that are contained within it. To run the ls command you would type l, then s and then push the enter key (try it!). After you hit enter the terminal will run the ls command and the ls command will print out a list of the files and folders in the current directory: this appears on the second and third lines (bin, Desktop etc.).
The first two commands we want to learn in addition to ls are pwd and cd. The pwd command is short for print working directory and will print out the current working directory. This is the folder that you are currently working in. The cd command is short for change directory and is used to change to a new working directory. You can then use ls to see what is in the new working directory:
$ pwd
/users/enojb
$ cd current/emat10006web
$ ls
html  Makefile  src
$ pwd
/users/enojb/current/emat10006web
In the session above I use pwd to show that I am currently in the directory /users/enojb (this is the name of my user directory on this computer). Within my user directory is a folder called current which contains things I am currently working on. In there is a folder called emat10006web which contains the files used for working on this unit. If I want to work in that directory I can change to it by typing cd current/emat10006web. Afterwards my current working directory is /users/enojb/current/emat10006web and if I run ls it will show me the contents of this new directory.
Running Python from the terminal
To run a Python script we need to first write the code and save it in a file called e.g. hello.py as explained above. I’ve already done this and I saved in a folder called current/Unistuff/Week1 in my user directory. In order to run the file I first need to open a terminal and then use the cd command to change directory to this folder e.g.:
$ cd current/Unistuff/Week1/
$ pwd
/users/enojb/current/Unistuff/Week1
$ ls
hello.py
So we can see that the current working directory is now /users/enojb/current/Unistuff/Week1. The /users/enojb part is my user directory on this (Linux) computer. We’ve used ls to see that there is one file in this directory: hello.py. To run the hello.py Python script we run the python command giving it the name of the script we want it to run:
$ python hello.py
Hello world!
We can see that running the script prints out “Hello world!” as expected. You may have already learned a way of running your Python programs using e.g. IDLE but the way that I just ran it from the terminal is really the normal way that a programmer might run a program such as this. It’s also what we need to do for our C programs as we’ll see in the next section. Before we move on though I think it’s important that you test that you are able to run your Python script from the terminal as just described (i.e. actually follow through the steps yourself).
Another thing we can do with the python command in the terminal is just to enter the Python interactive mode. This behaves like a terminal but where you type Python commands. To do this just run Python with no arguments:
$ python
Python 2.7.3 (default, Jun 22 2015, 19:33:41)
[GCC 4.6.3] on linux2
Type "help", "copyright", "credits" or "license" for more information.
>>> print('Hello world!')
Hello world!
>>> exit()
$
In the Python interactive shell you get a prompt that looks like >>> rather than $ and can type Python commands rather than shell commands. In this case I’m telling it to print hello world and then quitting but you can type more commands while in the interactive shell. To exit the Python shell you can either type exit() or push Ctrl-Z and hit enter (On OSX/Linux you exit with Ctrl-D). After exiting you will return to the normal shell and can see the $ prompt.
Hello world in C
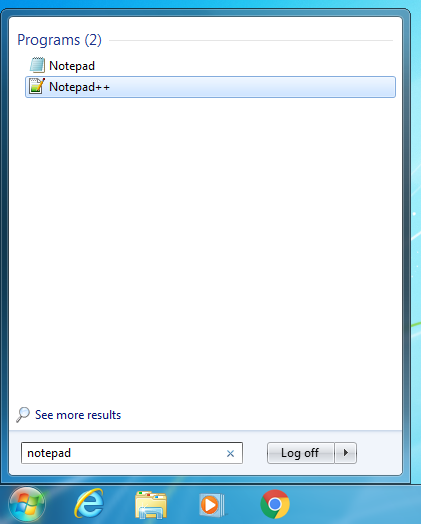
Now this is where we actually get to make our first C program. Firstly we need to use a code editor to write our C code. On the University lab machines I recommend “Notepad++”. It’s important not to confuse this with the very basic text editor called “Notepad” which comes with Windows. The “++” is supposed to indicate that it’s better (and it is much better). Go to the start menu and type “notepad” and then click on “Notepad++” (not “Notepad”) as shown here:
As Notepad++ opens it will show a couple of annoying error messages: just click “No” and then “Cancel” to get past those. Then you’re at your new code editor. You can type in your code and save it. First things first Notepad++ is used for writing code in many different programming languages. It won’t know what language you’re trying to use until you save the file and tell it what file extension to use. For example Python files have the extension “.py”. There are a few different file extensions used in C programming but the main one for now is the “.c” extension which is used for standard C code files. Go to the menu and choose “File” and “Save as”. Now choose the folder to save your file (put it in the same place as hello.py). Give the file the name hello.c and save it. Now Notepad++ will recognise that you are going to type C code into this file (and will colour the code in for you).
Our basic hello world program in C looks like this:
For now I don’t want to really focus on what all of the stuff in this C code means. Just know that you have to copy it exactly. Every letter must be the same. You cannot swap capital letters for lower case letters. The semicolon ; characters must appear in exactly the right places. You must use the same type of slash \ character. You must use double " quotes and not single ' quotes. Please copy the above code exactly into Notepad++ and save it.
Now unlike with our Python program a C program needs to be compiled before it can be used. We do this by running the gcc command in the terminal. So open a terminal, cd into the directory containing your hello.c file and compile and run your hello world C program like this:
$ gcc hello.c -o hello.exe
$ ./hello.exe
Hello world!
Now there are two commands in the terminal session above. First the command gcc hello.c -o hello.exe runs the gcc compiler on our C code. The extra arguments to gcc instruct the compiler that we want to compile the code in the file hello.c and we want the output (-o) file to be called hello.exe. The compiler reads the C code from hello.c and creates the new file hello.exe which is full of unreadable machine code. This is now a native executable file which we can run directly by typing ./hello.exe in the terminal. Note that both commands above assume that the working directory of the terminal is set to the folder containing hello.c and hello.exe so you must cd into that folder first.
Summary
And there we have it! During this page we’ve learned how to
- move around in the terminal
- run a Python program from the terminal
- use the Notepad++ code editor for writing C code
- write the most basic C program
- compile and run a single-file C program
Next section: Basic C